You need the following:
- an energy meter for 3-phases (e.g. Hager TE331 KNX or Shelly 3M Wifi)
- …and Home Assistant
You can also find more information in the official documentation energy of Home Assistant.
Show Devices and Product Links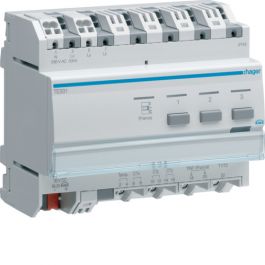

Example
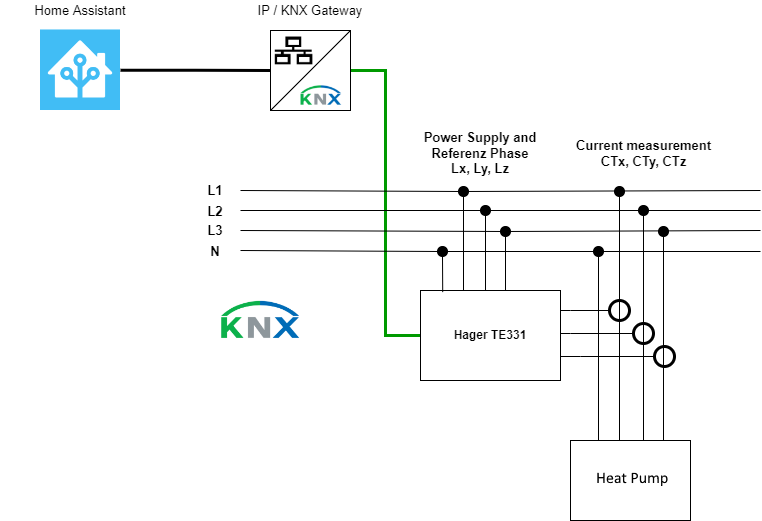
In this example, the electrical consumption of the heat pump is to be measured. The TE331 can of course also be used for other 3-phase measurements.
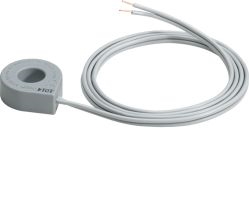
The transmitter needs 230V supply and reference phases. The power of each phase is measured by the transducers. The line to be measured must be routed through the transducer.
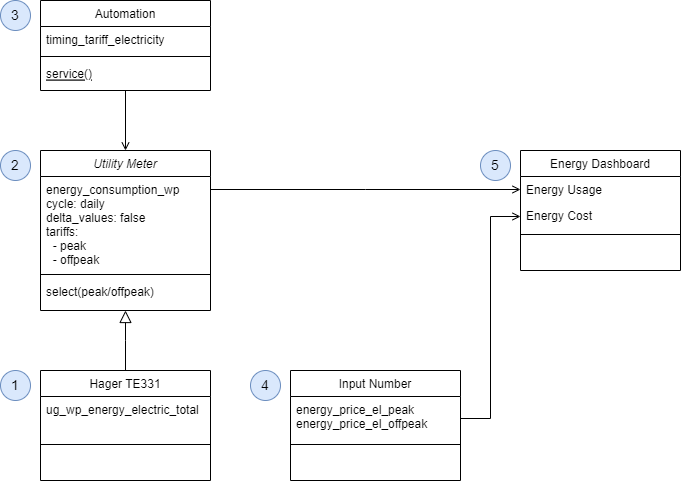
It’s a 5 step commissioning:
- Commissioning of energy meter (Hager TE331 KNX or any alternative energy meter, e.g. Shelly 3M)
- Create an Utility Meter, it measures energy consumption peak and offpeak
- Generate Automation, that switches between peak and offpeak
- Create an Input number to enter energy cost for peak and offpeak
- Set up the Energy Dashboard, it indicates consumption and calculates the price
Instead of the Hager TE331, any energy meter can be used
Guide
Commissioning of Hager TE331 KNX Energy MeterPrecondition: All devices were installed by a professional.
1. ETS Configuration of Hager Energy Meter
The transmitter can output power and energy for high tariff and low tariff as well as voltage and current for the 3 phases. The electricity tariff is not made via communication object 105, but via Home Assistant so that the tariff and the energy cost, or all time dependencies, are configured and displayed in Home Assistant.
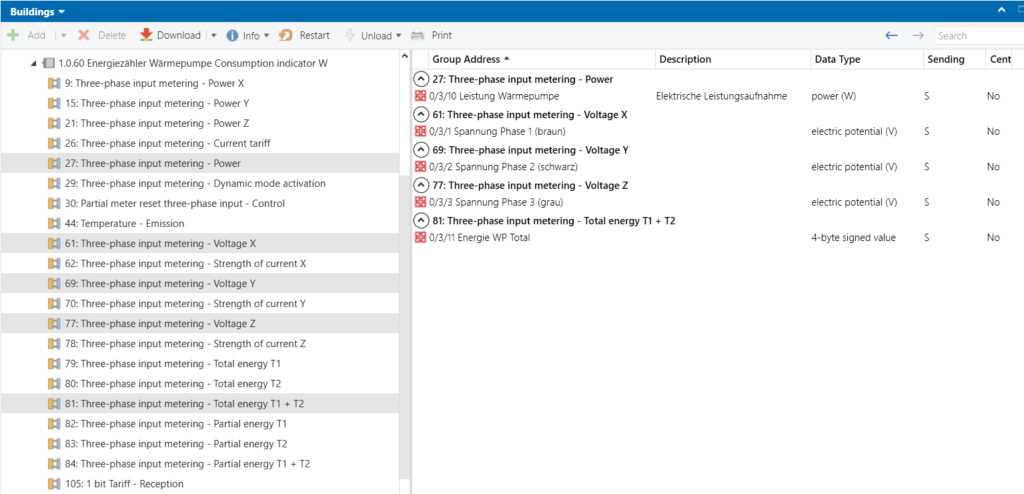
In this example the following communication objects are used:
- 27: Power (calculate COP of the heat pump)
- 61/69/77: Voltage X,Y,Z (As information)
- 81: Total energy T1 + T2 (energy measurement)
1. Integration of group address “Total Energy” in Home Assistant
configuration.yaml
sensor:
    # Group address of Hager TE331: Energy Total Heat Pump data type 13.010
    - name: "UG WP Energy Electric Total"
      state_address: "0/3/11"
      type: active_energy
The shelly integration in Home Assistant is quite seamless. There are also enough blogs how to do it.
Commissioning of Home Assistant
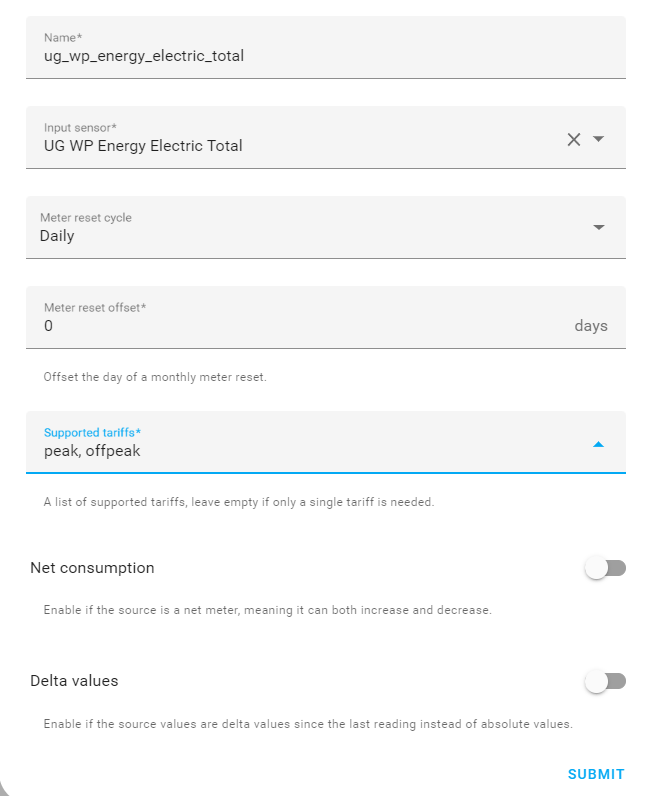
2. Create utility meter to measure daily consumption of heat pump
Records daily energy consumption in high (peak) and low (offpeak) tariff. Switching between peak and offpeak tariff is done by automation (step 3). The source of the utility meter is the entity that is created from the energy meter (step 1).
configuration.yaml
utility_meter:
# Daily consumption of the heat pump
energy_consumption_wp:
source: sensor.ug_wp_energy_electric_total
name: Heat Pump Energy Consumption
cycle: daily
delta_values: false
tariffs:
- peak
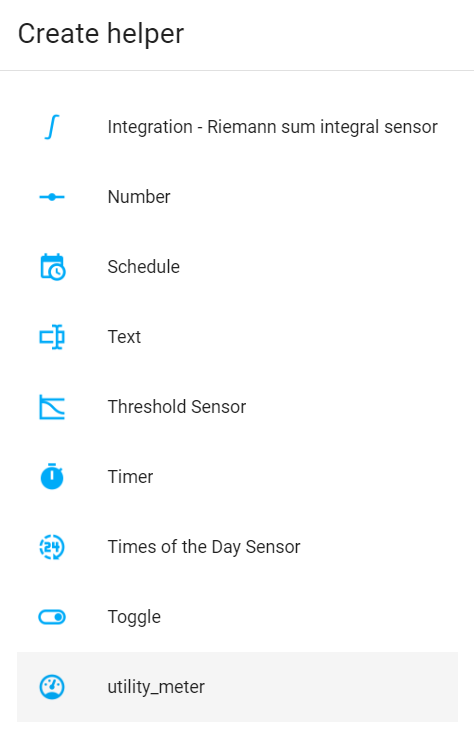
- offpeakIf you prefere to work with the grafical interface, navigate to Settings -> Helpers and click on CREATE HELPER.
You can create exactly the same utility_meter entity in the grafical interface.
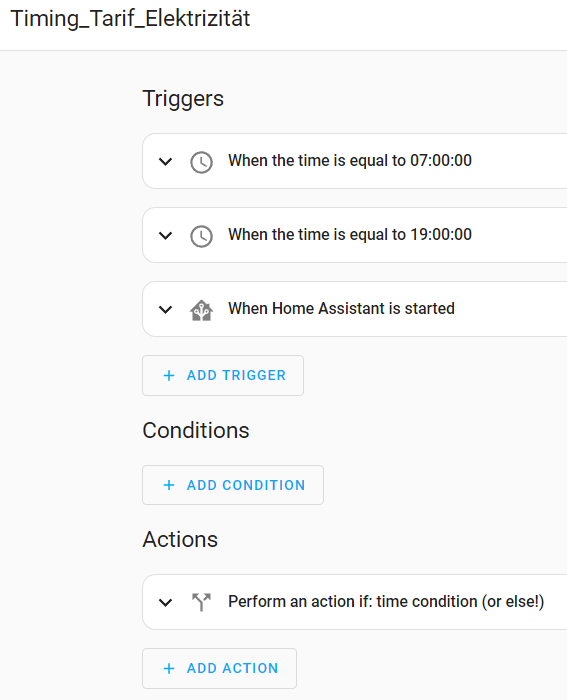
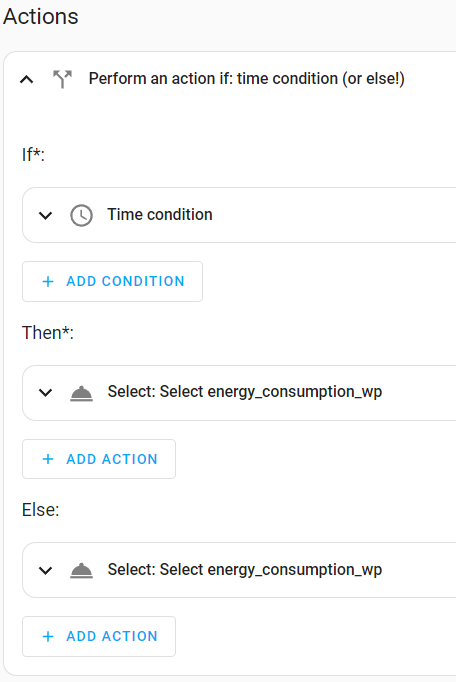
3. Automation to change between peak and offpeak
There are multiple entities needed to create the energy dashboard. The timing is done only within this automation. The automation switches the tariff of the utility meter created in step 2.
- Triggers are “Home Assistant Start” or “Time = 7:00” or “Time = 19:00”.
- Between 7:00 and 19:00 the peak tariff should be set, otherwise the offpeak tariff.
- The tariff is set in the utility meter “energy_consumption_wp”.
configuration.yaml
alias: "timing_tariff_electricity "
description: ""
trigger:
  - platform: time
    at: "07:00:00"
  - platform: time
    at: "19:00:00"
  - platform: homeassistant
    event: start
condition: []
action:
  - if:
      - condition: time
        before: "19:00:00"
        after: "07:00:00"
    then:
      - service: select.select_option
        data:
          option: peak
        target:
          entity_id: select.energy_consumption_wp
    else:
      - service: select.select_option
        data:
          option: offpeak
        target:
          entity_id: select.energy_consumption_wp
mode: single
If you prefere to work with the grafical interface, navigate to Settings -> Automation and Scenes and click on CREATE AUTOMATION
You can create exactly the same automation in the grafical interface.
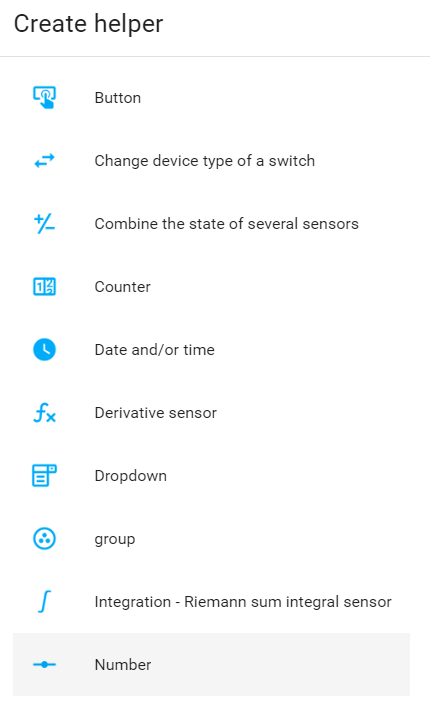
4. Create an input number to enter energy price for peak and offpeak
The price should be changeable via a dashboard because it can change.
configuration.yaml
input_number:
  # is used to calculate the peak cost in the energy dashboard
  energy_price_el_peak:
    name: Electricity Price Peak
    icon: mdi:speedometer
    unit_of_measurement: "EUR/kWh"
    min: 0
    max: 1
    step: 0.0001
    mode: box
  # is used for calculate the offpeak cost in the energy dashboard
  energy_price_el_offpeak:
    name: Electricity Price Offpeak
    icon: mdi:speedometer-slow
    unit_of_measurement: "EUR/kWh"
    min: 0
    max: 1
    step: 0.0001
    mode: box
If you prefere to work with the grafical interface, navigate to Settings -> Helpers and click on CREATE HELPER.

Create card electricity tariffs
The electricity prices should be changeable via a dashboard. The binary_sensor electricity_tariff_high is created so that the state from the utility meter becomes available in the card as a indication element.
configuration.yaml
template:
  - binary_sensor:
    # Indicates the current electricity tariff as Binary Sensor
      - name: electricity_tariff_high
        unique_id: electricity_tariff_high_id
        icon: mdi:cash
        state: >
          {% if is_state('select.energy_consumption_wp', 'peak') %}
            {{ true }}
          {% elif is_state('select.energy_consumption_wp', 'offpeak') %}
            {{ false }}
          {% endif %}
Configuration of Entity Card:
type: entities
entities:
  - entity: binary_sensor.system_electricity_tariff_high
    icon: mdi:cash
    name: Peak tariff
  - entity: input_number.system_el_tariff_peak
    icon: ''
    name: Peak Price
  - entity: input_number.system_el_tariff_offpeak
    name: Offpeak Price
title: Electricity tariff
state_color: true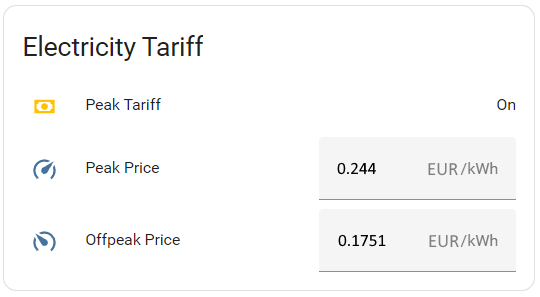
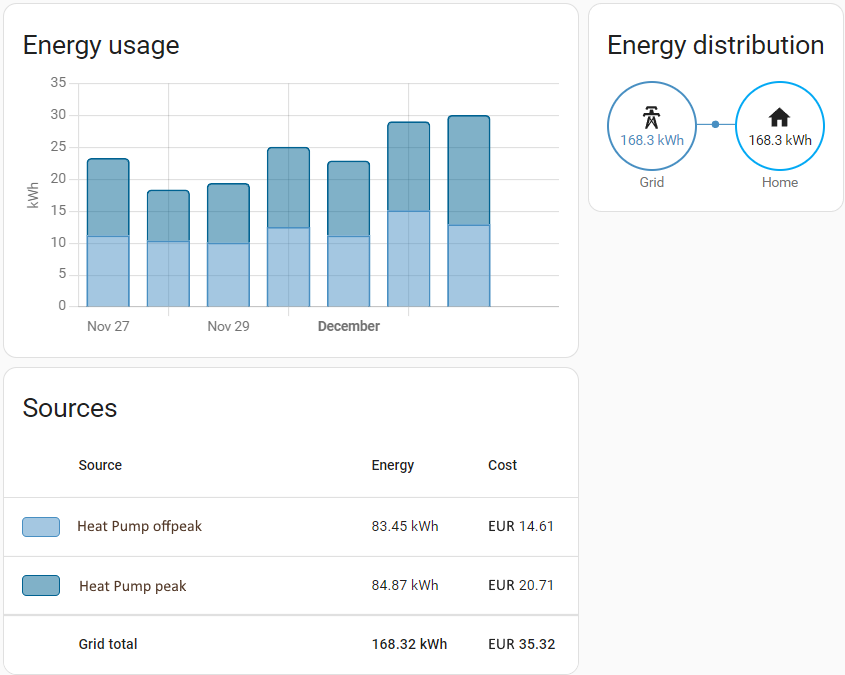
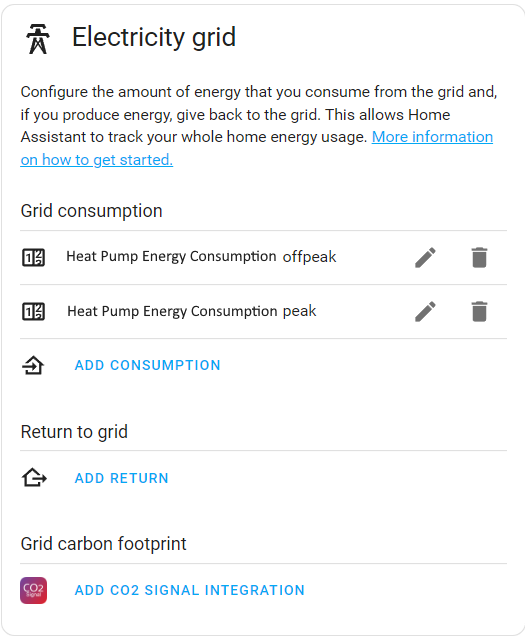
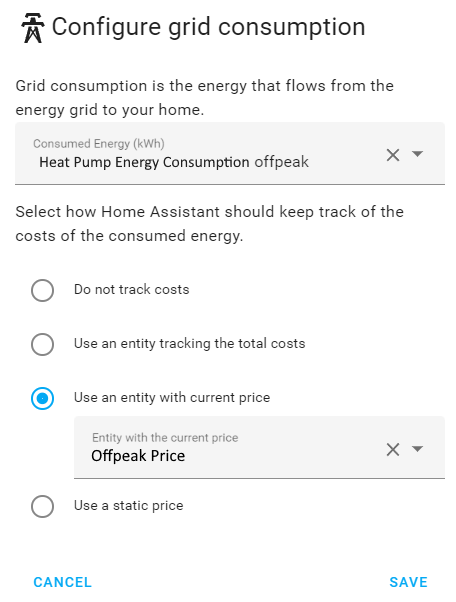
5. Integration into Energy Dashboard
Now you have to add the correct entities into the Energy Dashboard
- The utility meter from step 2 energy.consumption_wp contains a sensor.energy_consumption_wp_peak and a sensor.energy_consumption_wp_offpeak. You have to enter each of them in the Energy Dashboard. The Energy Dashboard shows the Name of the utility meter Heat Pump Energy Consumption.
- Open the edit dialog of each sensor to select “Use an entity with a current price” and select the according price. Offpeak Price for Offpeak Consumption and Peak Price for Peak Consumption.
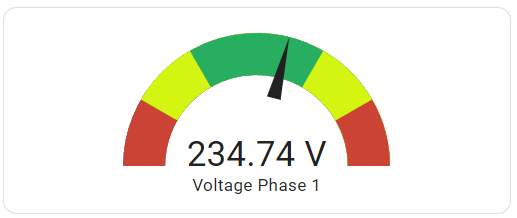
Home Assistant Indication of Phase Voltages
Here is an additional benefit, which comes free with the Hager TE331. The Hager TE331 provides the voltage of each phase. These are displayed in Home Assistant via a gauge card.
configuration.yaml:
# From Energy Meter Hager TE331
# Voltage Phase 1 data type 14.027
- name: "Voltage Phase 1"
  state_address: "0/3/1"
  type: electric_potential
# Voltage Phase 2 data type 14.027
- name: "Voltage Phase 2"
  state_address: "0/3/2"
  type: electric_potential
# Voltage Phase 3 data type 14.027
- name: "Voltage Phase 3"
  state_address: "0/3/3"
  type: electric_potential
Configuration of Entity Card:
type: gauge
entity: sensor.voltage_phase_1
min: 200
max: 260
needle: true
segments:
  - from: 0
    color: '#CB4335'
  - from: 210
    color: '#D3F511'
  - from: 220
    color: '#27AE60'
  - from: 240
    color: '#D3F511'
  - from: 250
    color: '#CB4335'
name: Voltage Phase 1